Shop My Etsy Shop for Handmade Gifts!

Showing posts with label Halloween. Show all posts

Wednesday, October 13, 2010

New Halloween Decor!

This is what one side looks like lit up. This is one side unlit. I wanted to make something new for the house. This has fit the bill for sure! The glass block is from a hobby store. I cut Basic Black cardstock down to fit on the outside and mounted some Night Owl DSP on top of that. I used the Crop-A-Dile to punch holes where it would reach. (I will use my retired Anywhere Hole punch for the next one). The block is filled with a small string of white lights. It is all wrapped up with Basic Black 1-1/4" Striped Grosgrain ribbon. It is two sided. I have a few more ideas for later~ Happy Stamping & Knitting!

Monday, November 03, 2008

Halloween Gathering

Since Halloween fell on a Friday night this year, I decided to throw a block party. I went and bought an outside fireplace at Target. Everyone brought their own Spirit (beverage of choice!) and a dish to share. It was soooooo warm for October, but then got chilly later so the fire came in handy! The kids made smores and the adults ate, drank, and were merry! Katie came in costume!!!! She sure showed the Halloween spirit! (Hi Katie!) The house was decorated and John McCain and Sarah Palin stopped by as well. It was a fun way to celebrate the Fall season.

Tuesday, October 28, 2008

Pillow Box Halloween Treat

If you haven't caught the Big Shot bug yet, let me tempt you. Shelli demo'd it on a local Utah station and I knew I had to find some acetate! You can see the video a few posts down.
Anyhoooo.....I got my acetate at Michael's in the fine arts section. Here is what the tablet looks like.
They are 9"x12" and come in a tablet of 25 sheets.
To make the box, you use the Pillow Box Bigz die . The sandwich layer is the cutting pad, the shims that come with the crease pad, the die cut, your acetate, then the crease pad.
I filled mine with Halloween M&M's, tied some Black Gingham ribbon around it to hold it closed. Then I stamped the tag image from Eat, Drink & Be Scary, onto Whisper White and cut the image out with Small Tag Punch, and the used the larger Tag Punch to cut the layer of Pumpkin Pie Cardstock. added some more Black Gingham ribbon to the tag, and attached it to the box with Mini glue dots.
Now you can make your own party favors for a Baby or Bridal Shower, Birthday parties, Wedding, and on and on and on!

Monday, October 20, 2008

Two Boo RAK's

I LOVE getting happy mail! You know......when you go to the mailbox and get something other than junk and bills! Well I got to RAK's (Random Act of Kindness) in the mail this past week. These two cards! How cute are they! And both have ghosts! Thanks Holly & Gail!

Thursday, October 16, 2008

Eat, Drink, & Be Scary!!!!!

I love this stamp set! You can see the whole set HERE. So I chose it to use for the make & take at Stamp Club tonight. This is a triangle card. I got the idea from Holly Young who was kind enough to send me a mock up. Can be folded flat to mail and then folds up to a little triangle! I will be making some of these for Christmas as little trees!!!! Sooo cute huh!

Wednesday, October 15, 2008

Boo to You!

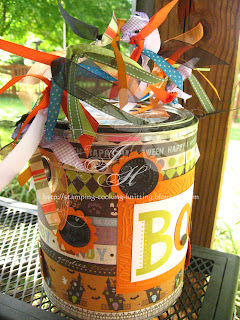
My cousin hosts a girls night out Halloween party every year. Everyone brings a dish and a gift. When you get there, you draw a number out of the hat. Then after we eat, we pick gifts in numerical order. #1 picks a gift and opens it. Then #2 goes. If #2 likes #1's gift she can take it or pick something new. This goes on until everyone has a turn. It gets hysterical!!! So my gift this year is the pair of socks I knitted (see prior post) and a great beaded bracelet that is black and white with a skeleton theme. I am putting them in this altered paint can!
Hey!
You found me!
If you are a
` member of UDI
leave me a
comment!

Saturday, October 11, 2008

4 Little Pumpkins sitting .......

While I was making these, I remember the song about 5 little pumpkins. But I didn't have enough ovals to make 5 so I am just showing 4. Remember this song.....................
Five little pumpkins sitting on a gate.
The first one said, "Oh my its getting late!"
The second one said, "There's a chill in the air."
The third one said, "But we don't care!"
The fourth one said, "Let's run and run and run!"
The fifth one said, "I'm ready for some fun!"
"Woo" went the wind and out went the lights
And the five little pumpkins rolled out of sight.

Candy Corn Necklace

Have had some time to play! I have made a few of these for my Etsy shop. These can be worn as a necklace or a pin.

Sunday, September 28, 2008

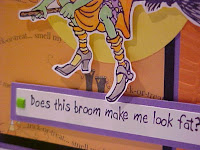
Does this broom make me look fat?????

Doesn't this crack you up!!!! I went to the Stampscrapartour convention in Westminster today. I did some shopping and was about to call it a day when I heard my number called as a door prize!!!! I won $100 in tour bucks to spend at the convention!!!! So of course I went back and got some things that I had eyeballed, but my purse said "NOOOOOOO" to. This is one of the sheets of unmounted I got. The stamps are by Starving Artist Stamps. You can see the sheet here. I colored her with Copics, used some Heidi Grace Halloween background paper, the spiderweb Coluzzle embossing folder, and a large circle punch for the moon. The corners were punched with the SU Ticket Corner punch.

Web of Spiders

I saw this idea in a newsletter from Paper Crafts. I used my coluzzle to cut a circle through both layers of the cardstock and designer paper. Then I taped silver cord between the two layers. I used the Spider punch by Martha Stewart and punched 2 spiders for each one and glued them back to back with the cord in-between. The base cardstock is Only Orange and the DSP is Ghostly Greetings. I got the little felt pumpkin in a tube of felt die cuts at the Target $1 Spot. I used the Scallop Edge punch for the bottom strip, but wanted it rough, so I didn't cut it as rounded.

Saturday, September 27, 2008

Frankie M&M Treat

This is the Make & Take the girls made at Stamp Club. I CASED this idea from a few of them out there. I had them tape the small cello bag closed, and used the black mini brads to attach it to Frankie, and therefore, giving him his bolts. It was fun to see how each one was different. Depending on the placement of the eyes and nose, really changed his expression.

Spooky Spider

I got the medium Spooky Spider rub-on and it fit on this large jar from Target. I filled it up with candy I don't really care for so I won't eat it! I put the ruler next to it so you can guage the size of it all. Not the best picture, but you get the idea! Get your rub on today! You can get them til the 31st!

Sunday, September 21, 2008

Ghostly Light

For the life of me, I cannot remember where I got these blank lights. They are a white base with a white tube you can decorate yourself. I have had them for YEARS!!!! So I found them when digging in my craft closet the other day. I used redline tape and then covered the tube with this halloween paper. The ghosts were made with my sizzix ghost die cut and my Big Shot with SU cardstock vellum. I used sticky strip, and bent their tails back some and adhered them to the light. I added purple ric-rac with sticky strip along the top and added some Dazzling Diamonds glitter.

Tuesday, September 16, 2008

Batgirl Mask

Well, Batgirl or Batboy. (if the boy doesn't mind ribbons!) I picked up a plain wooden bat mask at Michaels. Knew our new Ghostly Greetings Designer Series paper would be perfect for this I used Modge Podge to glue the paper on. Once it was dry, I cut out the excess with my exacto knife, then applied another layer of modge podge over the paper. Once this was dry, I sanded the edges with our sanding block and used an emory board for the eyes, nose, and fang areas. I used a green paint pen for the handle and back of the mask, added ribbon, and voila I was done! This can be used as a mask, or a cute decoration to hang on the wall!

Sunday, October 21, 2007

~Haunted Mansion~

Spooky...............
This is one of the stamps I got when I went to the stamp convention in Westminster. It was so cute and small that I fell in love with it! The stamp is called Haunted Mansion and is made by A Muse Artstamps. I stamped the image onto Whisper White cardstock (all cs is Stampin Up!) and colored with my SU Markers. I then punched the Pumpkin Pie and Basic Black cardstock with my Marvy scallop circle. I cut each circle in almost half, and off set them to make my frame for the image. I used my White gel pen to add dots to the scallops. I used a piece of Green Galore and ran in through my Cuttlebug and mounted onto Basic Black. I used Real Red for the other Cuttlebug layer and mounted it onto black. I used a stamp I had in my stash from somewhere......maybe the Target $1 spot from some time ago???? as the background on my Lavender Lace cs. Stapled some orange polka dot ribbon the the image and was done!

Wednesday, October 17, 2007

Clippies, Clippies, Everywhere!

I don't remember who shared this idea originally, but they are popping up everywhere! These are those big binder clips. But instead of putting the arms back to pinch and clip, you leave them like this! They will hold a photo, a recipe card, and even a GHOST! These are little favors I made up for the party! I got my clips at Staples and they are 2" across. I used some Halloween background paper that I got at Michael's. I hope the girls like them!

Sunday, October 07, 2007

Spooky Candy Tins

I love Halloween and I can't stop making things for it! I got these little tins in the wedding section as Michael's. I used sticky strip and ran a small strip of background paper around the bottom of the tin. Then I used sticky strip and applied the ribbon around the lid. The skeleton image is from Batty for You. I colored with SU markers and stamped onto Whisper White CS, and cut the image out with a circle punch, and layered it on Basic Black that I punched with the Scallop circle punch. (Hard to see in the photo) I used a glue stick to glue these layers together and to the tin lid. I filled with Halloween M&M's and they can't wait to be given away!

Which Witch Shoes?

This is a faux background card! I used the template from www.ink-stains.com and printed it onto Pumpkin Pie cs. I trimmed it and layered it onto Basic Black cs and then on the base card of Lovely Lilac cs. I used my Cutter Kit to distress the layers and then used my Basic Black in around the background image. The witch shoes are from a $1 stamp I got at Michael's, and I colored this with SU markers. I used Marvy punches for this. The spider is a Martha Stewart punch and I used the white gel pen for their eyes. The ribbon is from my stash and I ran my basic black ink over it to give it a distressed look . I used a buckle from the Hodge Podge Hardware kit.

Pretty Pumpkin

I love how this turned out! I printed out the template from Ink Stains.com onto two sheets of Pumpkin Pie CS. On one I used the template w/o the lines for my card. I took the template with the lines and cut that part of the pumkin out and ran through the Cuttlebug using the Textile Texture dry embossing folder, and then ran my Creamy Caramel ink pad all over it to make the texture pop out. Cut the sections out and applied to the card. I used a scrap piece of Old Olive for the stem. The tag is done with the retired Tag punch kit stamp and then punched with both the small and large tag punches. I also used the emossing folder on the small tag and repeated with the ink pad. I used the Three for You tag punch, and put a flower on the tag with a deco fastnener. Tied some linen thread and ribbon around the stem and voila!

Saturday, September 22, 2007

Bad to the Bone...BBBBBBBBad to the Bone!

Something about this stamp makes me sing that song! ( these are the words that encircle the skull)
These are ATC's (Artist Trading Cards) to swap at a local stamp convention I am going to this weekend. All supplies are Stampin' Up! except for the ribbon.
Stamps: Batty for You
Paper: Basic Black, Pumpkin Pie, Whisper White, Creepy Crawly Designer
Ink: Basic Black and Pumpkin Pie markers
Access: Scallop Circle punch, Circle punch, Ticket Corner punch, ribbon, snail adhesive.